I've been experimenting with making my own version of Celluclay, and I think I've got it finally, although it's not my version. It's everybody's version, because I had a lot of help in making it work.
I did a first cast (first photo above) with an egg carton type of pulp, pressed wet and flattened with a sponge, to remove the moisture. Then I painted some
boiled wheat paste over it, because I noticed it was going to crack and be weak.
It took a long time to apply, and a longer time to dry, some definition was lost, and the result was a little bit weak, but I will be able to strengthen it with paper strips as I had planned.
 EXCITING RESULTS
Then I was advised to add clay to the mix. Wow! It feels, behaves, smells, dries and looks like Celluclay!
It took me no more than 15 minutes to apply the pulp into the silicone mold, compared to at least 45 minutes with the sponge methods with the previous batch.
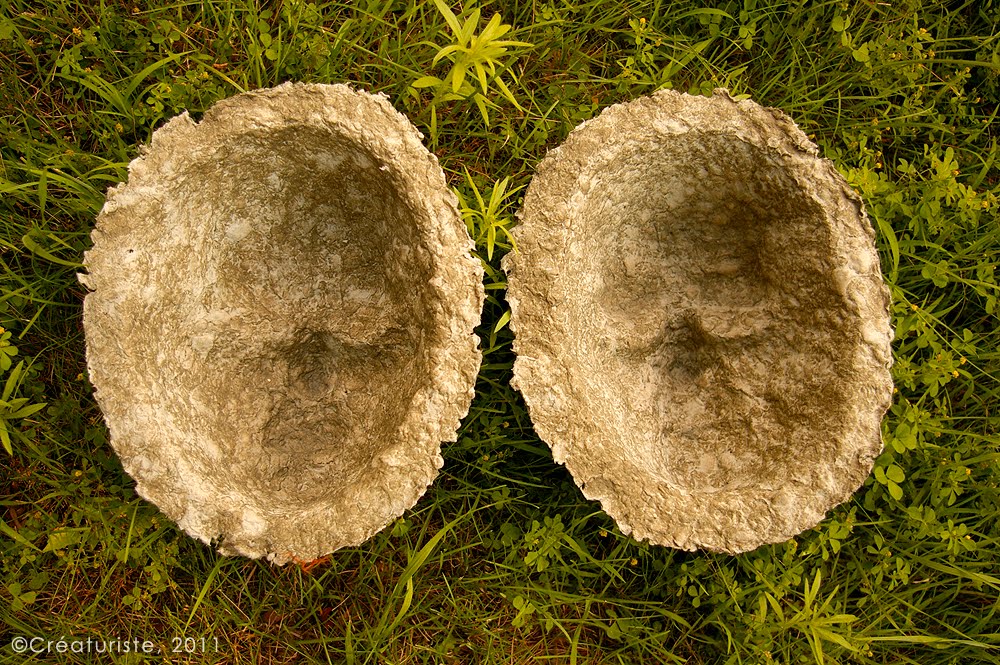
The picture to the left shows you a detail shot of the results, the following pics are from the same recipe with clay.
Better definition, better detail, better smoothness.
It dries a bit faster too, but it's twice the weight compared to the pulp-and-paste version. Still well-within acceptable limits for now. I will see when the masks are strengthened, sealed, and painted. Thin spots can be detected by placing the mask in front of a strong light source, and it can be fixed by adding more pulp until no more light is showing. Drying this quickly and thoroughly is very important to prevent warping.
I will trim each mask, cut out the eye and nostril holes, add a wire rim around the mask's edge, and re-seal all cut edges with paper mache strips and boiled wheat paste. When fully dry, I will sand it where need be, seal with multiple coats of white shellac until water proof, then prime, then paint, then varnish.
NOTE
Click on pics to see the yummy texture!
For years I was striving to make smooth paper mache strips, and when I succeeded, I realized it was not always a good thing to have the smooth perfection. sometimes it's just too perfect, too boring! Pulp has its own "living" texture, which is why I always come back to trying to make it work, in hopes of saving time and getting that wonderful subtle texture. I succeeded this time, with help, and I can feel the end result will be even better.
RECIPE
The measurements are very estimated, because I eyeball everything, and go by feel, but this should work for you too. To make pulp, see
this article.
•5 cups of
wet pulp, water almost all squeezed out (wood paper based, such as newspaper or egg cartons)
•two cups of clay powder (I used pure green clay for facials, found in a health food store. White clay would work just as well, and pre-mixed potters clay would likely be ok too)
Mix the clay powder into the wheat paste until smooth, then incorporate into the pulp until smooth. If too thick, add little more wheat paste.
To cast with this using my silicone molds, I made my mix into more of a grout than a "clay", so it was easily patted down in place, then flattened thinly into my mold, using a thick Cellulose sponge to aborsb the moisture and flatten the pulp. I use a smaller piece that I cut out of the sponge, to make access easier for smller areas. Try to avoid sideways movement, as it can pull the pulp and tear it. Every squeeze's water accumulation is squeezed out into a bucket. It also shows me how much water I was able to extract, and may indicate if I should make the next batch more or less liquid.
You could use a latex mold. For a plaster mold, you'll need to seal it well to prevent the pulp from sticking to the plaster. White petroleum jelly is often used, but I prefer to use a soap based sealer. Next batch of the paper-clay, I'm going to try to reduce the amount of liquid, to see if it will reduce shrinkage. My first two masks with this recipe turned out well, however. Look for yourselves!


The inner view shows an irregularity in color. I suspect it might be the clay needing to be mixed better with the pulp.
Upcoming experiments:
Newspaper pulp mixed well with boiled wheat paste. No clay this time. My hope is that I will get the same definition, without the added weight that clay brings.
UPDATES:
•I made three new casts, using the newspaper pulp instead of the egg cartons.
I boiled the pulp as a precaution. I saw the inks separate from the pulp. Kinda weird.
My mix this time included clay, but more paper and wheat paste than the previous batch.
Because of this, it was a more cream-like consistency, and was faster to apply, but was too liquid for reasonable dry times, and I was afraid of extreme shrinkage. so I got a new Cellulose sponge, cut a smaller piece off of it to make it easier to get into the mold details, and started pressing the moisture away. What a difference it makes to have a high quality sponge that's thick enough!
Pressing without moving sideways is very important to prevent tearing of the pulp. Some of it will happen anyways, so add more wet pulp and press it down with the sponge. Invisible seams!
I was able to remove between 1.5 and 2 cups of liquid with this method.
I already have a smoother interior or the mask, the wall will be thinner, and the drying times will be reasonable, I can feel it!
•I added a coat of wheat paste over the first cast of the three eyed mutant, since that first one's pulp was not mixed with wheat paste, just painted with it once it was inside the mask. It will help keep the texture intact when I start surface smoothing.
•So far, I will have at least 4 new masks for sale before the end of summer.
I'm very busy, but if I wasn't, I'd be rushing the finishing of the mutant mask, just so I can feel the fun of painting it!
•Now that all the casts are dry, I was able to compare them (unsealed, no added paper strips or wire contour). Cotton pulp +wheat paste is the strongest, lightest and thinnest of all the mixes. It also shows less shrinkage and the texture is acceptable. Adding clay to newspaper or egg carton based pulp (with wheat paste) adds hardness and weight, but not much strength against crushing or impact. All mixes work good for display items, but for performance wearable masks, none meet my criteria as-is. I will add strips to the weakest of the casts to see if it's worth the effort.
• I added two layers of Kraft paper strip to the newspaper pulp casts of the masks, and the added strength is surprising! With the wire outline, I have a feeling these masks will be up to my standards of durability. The kraft I used this time is thin, likely the same that lunch paper bags are made of in Canada and the USA.
I crumpled and soaked and wrung out the water from the paper, to soften it before use.
I have added pulp over strips before, and it works so long as the strip project is strong and stable.
Yet I had never fully successfully cast pulp by itself before, as each cast required major "surgery" to look good. Now, with just newspaper pulp and boiled wheat paste, pressed down wioth a thick cellulose sponge to remopve all mositure that I could, I have succeeded. The strips stuck well to the dry pulp cast, but I made sure of that by rubbing a very thin coat of wheat paste all over the cast prior to adding the strips. Adding anything to a non-sealed paste-based project can temporarily make it soft again, so I was careful and placed the casts back into the molds, for safe keeping until dry enough again (in front of a fan for a few hours) to stand on their own without warping. Careful extra drying is done once release again from the mold.
I will report back when the first mask is fully assembled, dry, sealed, and put throuh my vigourous testing.
Perhaps before...
...
Told ya!
Three of the casts (the two newspaper pulps and the one egg carton) are now trimmed, edged with wire, and have an extra layer of Kraft paper over the front.
I love the subtle texture even more now, and it's not even sanded down yet.
Semi-dry, i can already tell these masks are very strong.
Sealing them with shellac will only increase their durability.
Photo here:

• I made two new casts, still using the newspaper pulp and boiled wheat paste, pressed down with the cellulose sponge. I decided to try applying the pulp as thin as I could without seeing the mold through it once sponged. It works even better, dries faster, and weighs less. Of course there are more tiny holes that you can see in front of a lightsource, but these will be fixed with the two layers of Kraft paper inside, and one on the surface of the mask. I feel like I am getting close to a favorite way of doing paper mache masks. Faster, better resolution, just as strong as my all-strip masks? It's all goooooood!